Most parent/guardian accounts will have been created using your
Add a Parent/Guardian Account
There are a couple ways you can choose to add a Parent/Guardian account. If you have a specific student in mind who needs a parent/guardian account linked, you might search for that student or browse through the student list.
Alternatively, if you're working through a list of parents/guardians, you might find it easier to add their accounts and link the students after.
Use a Student Profile to Add a Parent/Guardian
If you know the name or ID of the student who needs a parent/guardian account added to their profile, add the parent/guardian directly from the student's profile page in your Educator Account.
To use a student profile to add a parent/guardian account:
-
In the search bar located at the top of any page in your educator account, enter the student's name or ID.
 Click to enlarge
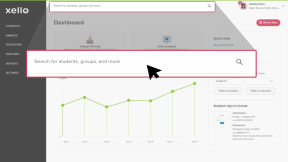
 Tip: Alternatively, from the left menu, click Students and select Student list to browse the full list of students.
 -
Click on the student's name. The About student tab of their profile opens.
 Click to enlarge
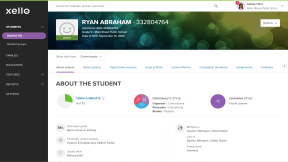
- Click the Parents tab.
- Click Add Parent.
- Enter the parent/guardian's email and click Next.
 Note: Parent/guardian accounts require an active email address. An empty email field or a default filler email address will prevent parent/guardian access.
 - Enter their full name and, optionally, their phone number. Click Next.
- Confirm the correct student is linked and click Add Parent.
- To send the invite to the parent/guardian's email, click Send Invite.
Note: You won't see this option if your school has opted to automatically send invites.
Use the Families Section to add a Parent/Guardian
Rather than searching for the student first to create the parent/guardian account, you can use the Families section to create the accounts.
To add a parent/guardian using the Families section:
- From your educator account, click Families to open the list of Parents and guardians.
 Click to enlarge
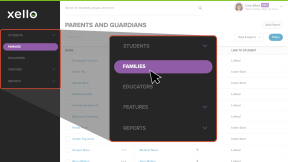
- Click Add Parent.
 Click to enlarge
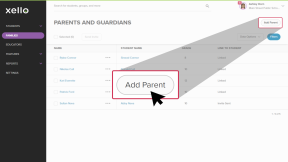
- Enter the parent/guardian's email and click Next.
Note: Parent/guardian accounts require an active email address. An empty email field or a default filler email address will prevent parent/guardian access.
- Enter their full name and, optionally, their phone number. Click Next.
- Assign a student to the Parent/Guardian account by searching their name or student ID.
- To view the student profile, click on their name. This will navigate you away from the Add Parent workflow.
- Once you've found and selected the student, click Add Parent.
- To send the invite to the parent/guardian's email, click Send Invite.
Note: You won't see this option if your school has opted to automatically send invites.
Invite a Parent/Guardian
Once a parent/guardian account has been created, they still need to be invited before they can begin accessing their account. The invitation will be sent via email to the address listed when the parent/guardian account was created. It will include a link to Xello Family where they will activate their account.
If your school has opted to automatically send invites, the email will send once the account is created. Otherwise, follow the steps below to invite parent/guardians.
To invite a parent/guardian to activate their Xello Family account:
- From your educator account, click Families to open the list of Parents and guardians.
Click to enlarge
- To select the parent/guardian, click the box next to their name.
- You can select multiple accounts to send invites to.
- From the top of the page, click Send Invite.
- Confirm you want to send the invitation and click Send.
Bulk Invite Parent/Guardians
You can send out multiple invites at once with bulk sending.
Bulk invites take more time to process than an individual invitation. To minimize the processing time, it's recommended you filter the Parents and Guardians list before selecting who to send the invites to. The optimal filter to use is Link to Student:
- Filter the list by Invite Not Sent to send all activation emails together.
- Filter by Invite Sent to send a follow-up email to prompt parents/guardians to activate their account or confirm student links.
- Filter the list by Linked to view which parents have activated their account and confirmed at least 1 student - there’s no need to send follow-up emails for this status.
To bulk invite parents/guardians:
- From your educator account, click Families to open the list of Parents and guardians.
Click to enlarge
- From the top of the list, click the Selected (0) box to select every parent/guardian on the list.
- If you've applied a filter, only the names filtered will be selected.
- Click Send Invite.
- Confirm you want to send the invitation to the selected parents/guardians and click Send.
- The status in the Link to Student column will update to Processing to indicate that the invites are queued to send. Once they've sent, the status will update.