Educators with administrator or user level access can add a local scholarship to Xello for students to search and apply for. Be sure to keep local scholarships updated and current, and edit previously created scholarships when necessary.
Scholarships added by educators at a school will be labeled as School-added for students. To help bring them to students' attention, they'll be sorted towards the top of the list of scholarship matches.
You can choose whether to make the scholarship visible to your students right away or to turn off visibility until the scholarship is available for students to apply. If you remove visibility to a scholarship after a student has saved it, the scholarship will then be tagged as Unavailable for the student.
Your educator permissions will determine what you can access and the actions you can complete in the College section in Xello. To learn more, including how to find out your permissions, check out Permissions and college applications.
| Admin | User | Limited | |
|---|---|---|---|
| Access and actions |
|
|
|
Add a scholarship
If you know of a local scholarship, add it to Xello so your students can view the opportunity and apply.
Make sure the scholarship includes as much information as you have available. The more information and keywords for your students to search, the more likely they are to find it, and apply for it.
Some tips to keep in mind when completing a scholarship form:
- Complete the eligibility requirements section so your students are better matched with scholarships.
- The more information you include, the more likely your students are to get matched. Scholarship matches are determined when the answers students give in their scholarship profile correspond to details included in the scholarship.
- For information not included anywhere else, use the larger text boxes to help draw attention and make it easier for students to read.
- Students use deadlines and award amounts to filter and prioritize scholarships, so make sure this information is available and updated.
To add a local scholarship:
- From your educator account, under Features, click College and select Scholarships.
 Click to enlarge
- From next to School-added scholarships, click Manage.
 Click to enlarge
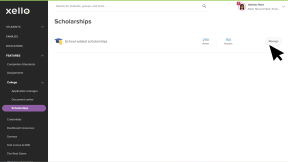
- Click Add scholarship to open the scholarship form.
 Click to enlarge
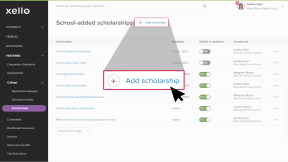
- Fill out all the necessary information.
- Click Add link to include a link to where the scholarship is offered, or more additional information.
- Click Add file to upload a file. This could be helpful if the scholarship application form is in a PDF, for example.
- To make the scholarship show for your students, switch the Visible to students toggle to YES. It will be immediately visible to them once you publish.
 Click to enlarge
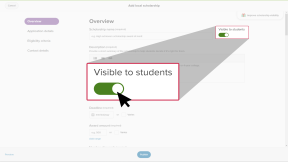
- Click Preview to view how the scholarship will look for your students.
 Click to enlarge
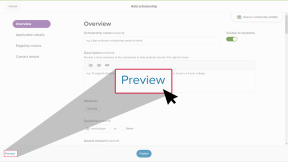
- To save and complete, click Publish.
Edit a scholarship
Keep scholarships in Xello updated and current for your students.
To edit a previously created scholarship:
- From your educator account, under Features, click College and select Scholarships.Click to enlarge
- From next to School-added scholarships, click Manage.Click to enlarge
- Locate the scholarship you'd like to edit
- Click the three-dot menu, and select Edit.
 Click to enlarge
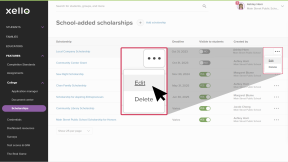
- Make the necessary changes and click Publish.
Additional resources
-
 PDF
PDFScholarships guide - student guide
PDF
PDFScholarships guide - student guideGive this guide to students to help them find and track scholarships in Xello.
-
 Short video
Discover your scholarship options - student-facing video
Short video
Short videoDiscover your scholarship options - student-facing videoHelp students learn how to navigate their scholarship options. From understanding different types of scholarships and how they work, to where students can find verified scholarship opportunities, when to apply, and even what to watch out for.
-
PDF
PDFHow to track a college application - student guide
Share this guide with your students to help them learn how to create and track college applications in Xello.
-
Short video
Short videoPaying for college - student-facing video
Help students learn how to navigate their financial aid options. From applying for FAFSA to learning about scholarships, grants, work-study, and loans.
-
 Recording
Navigating college financial aid with students
Recording
RecordingNavigating college financial aid with studentsMaster federal student aid (grants, work-study, loans) with Xello! Guide students through the FAFSA®, cost comparison, scholarships, and tracking for confident post-secondary financial planning.
-
Recording