In Xello, students use the college planning tool to create a tracker that provides them with a checklist for each application. The checklist allows students to create, monitor, and mark as complete the various tasks they need for each of their college applications. They can also request a recommendation letter or their transcript be sent, directly from the checklist.
Explore schools
Students will find a lot of information in school profiles to help them decide if the institution is one they want to apply to.
How students explore schools in Xello:
- From top menu of any page in Xello, students click Explore.
- From the Explore options page, students click Explore schools.
 Click to enlarge
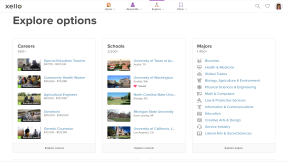
- They'll be able to browse through the list of institutions. Or they can click More filters to narrow the list by a variety of factors, including location, cost, areas of study, and more.
 Click to enlarge
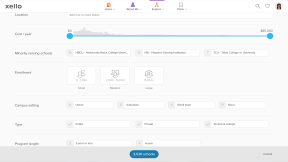
- Clicking on a school will open its profile.
Once they've clicked on a school to open the profile, they'll find lots of information, including an overview with high-level details like tuition costs, acceptance rate, important dates and similar schools.
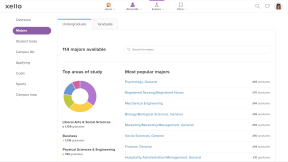
As they scroll down, they'll find information such as majors offered at the institution, student body demographic, and campus life.

In the Applying section, students can check out the chances of admission scattergram. This will show them the acceptance rates and average GPA at the school. They'll also be able to view their own chances of admission by comparing their SAT/ACT and GPA scores with historical data from past applicants. They'll see their own avatar on a graph alongside the data points of previous applicants. They can click filters to add or remove those who were accepted, waitlisted, or not accepted, and by admission type.
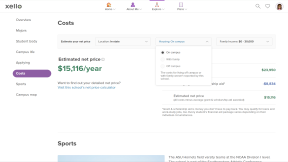
By scrolling down the school profile, students can get in-depth, dynamic information on costs at the institution.

To quickly select the school when they create a tracker, students can click the Save button to record it to their list of Saved options. The options can be accessed at any time by clicking the heart in the top corner.


Create a college application tracker
The first thing a student must do to track their tasks, view their deadlines, request transcripts and recommendation letters be sent, is build an Application tracker for each institution they’re applying to.
How students create a college applications tracker:
- They open Plans and click College Planning.
 Click to enlarge
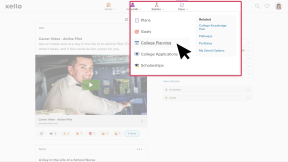
- Under College Applications, they click Create Your First Application.
 Click to enlarge
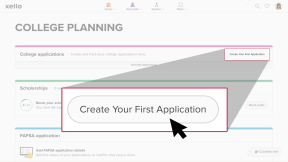
- They choose one of their saved schools and click Next.
 Click to enlarge
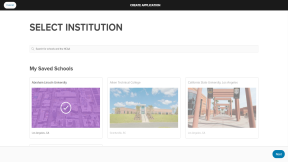
- If they don't have any saved schools yet, they search for the institution and click Select, then Next.
- They select an application method and admission type. If available, the application deadline will automatically populate. They can review and edit the application deadline, if necessary.
- The deadline is reported by the college, but students are encouraged to check the college website for any recent changes.
- To finish building the application tracker they click Create.
 Click to enlarge
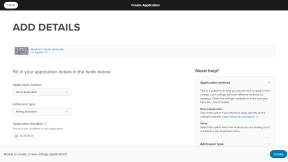
Edit a college application tracker
Students can later edit their college application tracker. They can update the application method, application type, and application deadline.
To edit a college application tracker:
- From the top of the college application tracker they want to edit, they click the three dot menu.
- They click Edit application.
 Click to enlarge
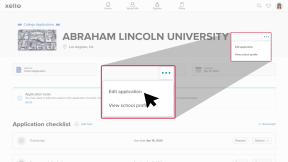
- They make their changes and click Save.
Add or create tasks
Once the college application tracker has been created, students are provided with an application checklist with any mandatory transcript or recommendation letter requirements. To help them better track their application submission, the checklist will also include a task to mark their application as submitted when they're ready. Students can also add any other requirements or their own custom tasks to track.
How students add or create a task:
- From the institution's application tracker, the student clicks Add Task.
 Click to enlarge
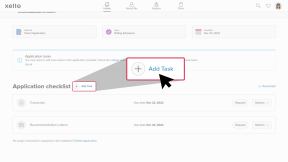
- In the Add Task window, they click the Select a Task dropdown and select a suggested one, or click Create Custom Task.
- If creating their own, they're required to give their task a name.
 Click to enlarge
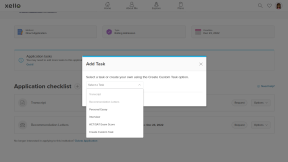
- When finished, they click Add Task.
Edit due dates
Students can add a due date to their custom tasks or edit a due date on mandatory tasks. When available, mandatory tasks with a deadline set by the college will be automatically populated.
How students add or edit a due date on a task:
- From the institution's application tracker, they find the task where they'd like to add a due date.
- They click the Options dropdown and select whichever is available: Add due date or Edit due date.
 Click to enlarge
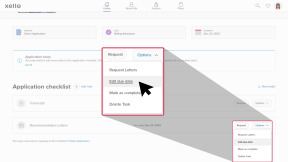
-
Once they choose the date, they click Save.
- The due date will now show in the same line as the task.
Mark as complete
To give students full control and freedom over their own application tracker, they can mark any of the tasks in their application checklist as complete. They can reopen a task the same way if they change their mind.
How students change a task's completion status:
- From the institution's application tracker, under Application Checklist, they find the task where they'd like to change the completion status.
- To the right, they click the Options dropdown and select Mark as complete.
 Click to enlarge
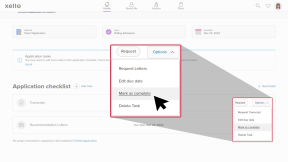
- By following the same steps, the student can reverse their action when they click Reopen Task.
Record admission decisions
Once a student has heard back from the institution about their application, they can report the outcome in Xello. The available outcomes are:
- Accepted
- Waitlisted - accepted
- Waitlisted
- Waitlisted - not accepted
- Not accepted
Students can change their admission decision in Xello from College applications or from the institution's Application tracker page. Admission decisions can also be recorded by educators for the student on the student's profile. Additionally, parents/guardians can update from the student's profile while in Xello Family.
How a student records their admission decision in Xello:
- On the College applications page, they scroll down to the Application tracker section and locate the institution they heard from. Or, they navigate to the institution's application profile.
- In the Admission decision dropdown, they select a decision.
 Click to enlarge
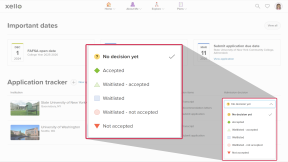
Delete an application
If a student creates an application tracker in Xello and decides they no longer wish to track the application, or if they made a mistake in creating the tracker, they can opt to delete it.
How students delete an application:
- From the institution they want to stop tracking, at the bottom of the Application Checklist, students click the Delete Application link.
 Click to enlarge
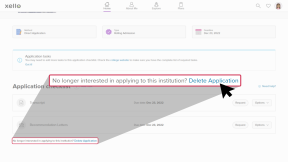
- They need to confirm that they understand:
- All tasks will be deleted and any progress made will be lost, and
- They will no longer be able to view or track requests
 Click to enlarge
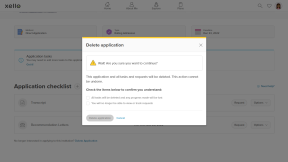
- Once they've checked both boxes, they click Delete Application.
- That institution's application will be removed from the student's list of applications.
Additional resources
-
 PDF
PDFHow to track a college application - student guide
PDF
PDFHow to track a college application - student guideShare this guide with your students to help them learn how to create and track college applications in Xello.
-
 Short video
Paying for college - student-facing video
Short video
Short videoPaying for college - student-facing videoHelp students learn how to navigate their financial aid options. From applying for FAFSA to learning about scholarships, grants, work-study, and loans.
-
PDF
PDFScholarships guide - student guide
Give this guide to students to help them find and track scholarships in Xello.
-
Short video
Short videoDiscover your scholarship options - student-facing video
Help students learn how to navigate their scholarship options. From understanding different types of scholarships and how they work, to where students can find verified scholarship opportunities, when to apply, and even what to watch out for.
-
PDF
PDFMy college fair preparation lesson planIn this lesson plan, students will make the most of their college fair experience with some pre-fair research in Xello, followed by preparation of questions to ask college fair representatives.
-
 Google doc
College fair preparation handoutShare this handout with students to help them get the most out of college fairs by creating a portfolio that summarizes their college research.
Google doc
Google docCollege fair preparation handoutShare this handout with students to help them get the most out of college fairs by creating a portfolio that summarizes their college research. -
 Presentation
College fair flyerEdit, print, and distribute this flyer to help prepare your students for any upcoming college fairs.
Presentation
PresentationCollege fair flyerEdit, print, and distribute this flyer to help prepare your students for any upcoming college fairs. -
 Recording
recordingManaging students' college applications in Xello New
Recording
recordingManaging students' college applications in Xello NewCheck out this short walkthrough to learn how to request college documents on your students' behalf.
-
Recording
RecordingHow Xello supports college-bound students applying for FAFSA
Learn how Xello’s suite of College Planning tools can help you empower your US college-bound students to submit their Free Application for Federal Student Aid (FAFSA).
-
Recording
RecordingStreamlining college applications: A guide to success
Master college applications with Xello! Help students track deadlines and document requests. Learn educator workflows for seamless transcript and recommendation letter management and Common App fulfillment.
-
PDF
PDFCommon App annual tasks - admin and counselor guide
A guide to help admin and counselors with wind-down tasks before the end of the Common App school year and start-up tasks before the next.